
Authors: Gavin Lloyd / Editor: Steve Fordham / Reviewer: Stewart McMorran, Kathryn Blackmore / Code: RP4, SLO4, TP3 / Published: 03/12/2019
This session provides training in traditional/blunt chest drain insertion for adult patients following trauma.
The session examines:
- Indications
- Preparation
- Technique
- Post-procedural management
- Troubleshooting complex cases
The objectives are for you to understand and be able to apply the key steps that will lead to safe insertion of a chest drain in the emergency department (ED).
Attaining Competency
Level I: The session will form Level I of your training required for chest drain insertion.
Level IIA: You will use this base knowledge to be able to participate in a workshop and perform the practical procedure on a manikin, or animal model, using a ‘4 stage teaching style’.
Level IIB: You will have an opportunity to remind yourself of the steps using the session online, prior to the first time you perform this procedure on a patient under senior supervision. An appropriate work place based assessment (WPBA) form will be used to log your activities.
Level III: Once you have performed a certain number of chest drain insertions, you will complete an appropriate WPBA on a patient and be signed off as being competent by your education supervisor.
Discuss attainment of competency with your educational supervisor.
In the following four scenarios, carefully consider whether a chest drain is indicated in the first instance. If so; consider the urgency of insertion.
Scenario 1
A 110 kg, 30-year-old male has fallen off his horse whilst riding after lunch. His injuries identified on completion of the primary survey are:
Click on the images to enlarge.
 |
 |
| Fig 1: # 4-8th left ribs complicated by a small pneumothorax and moderate haemothorax | Fig 2: Open # tibia/fibula |
Consider two reasons why a chest drain might be indicated in this patient.
Two reasons why a chest drain might be indicated in this patient are the need to:
- Drain the haemothorax, then quantify and monitor further blood loss. In general, a chest drain is indicated if a haemothorax is sufficiently large to be seen on chest x-ray
- Avoid tension of existing pneumothorax, given planned intermittent positive pressure ventilation (IPPV) for lower leg fracture
Does he need the chest drain inserted while he is in the ED?
Not necessarily. If he remains stable, the procedure will be easier and better tolerated by the patient once he is anaesthetised in the anaesthetic room. Negotiate with your anaesthetic colleague. Chest drain insertion in the ED is advisable if surgery is not planned in the next 4 hours.
Learning bite
A chest drain is indicated if a haemothorax is sufficiently large to be seen on the chest x-ray.
Scenario 2

At the 08.00 handover a 36-year-old alcoholic man is presented to you. He has been the victim of an assault, receiving blows to both head and torso. His observations overnight have been generally unremarkable. His chest x-ray is as demonstrated (click on the x-ray to enlarge).
Is a chest drain indicated?
No – in stable patients with isolated chest injuries and a chest x-ray showing a simple small pneumothorax, a conservative approach (no chest drain, unless clinical deterioration) appears safe [2].
Learning bite
Observation (rather than chest drain) is acceptable in selected patients with a small traumatic pneumothorax.
Scenario 3

A 56-year-old woman has jumped from a third floor window. Her supine chest x-ray is normal, except for a widened mediastinum. As part of her ongoing clinical evaluation you request a CT chest to exclude aortic injury. This demonstrates an occult right pneumothorax and bilateral basal atelectasis only (click on the CT to enlarge).
Does she require a chest drain?
No, provided she does not require IPPV in managing any other injuries [3]. The existence of the pneumothorax needs clear emphasis in the handover to in-house specialty teams, notably the anaesthetic team should they become involved in her care. You also need to document your handover discussion.
Scenario 4
A heavily-built young motorcyclist has just arrived in the resuscitation room. He collided with an oncoming vehicle following loss of control at speed on a bend. Intubated and ventilated at the scene, the paramedics report a likely developing right-sided tension pneumothorax. You concur. You detect decreased breath sounds with hyper-resonance on the right, decreasing saturations and blood pressure (70 systolic) and markedly increased resistance to bagging.
Which of the following is the best next move?
An immediate chest x-ray is not warranted, since there is good evidence in this situation of unstable tension pneumothorax, notably the increased resistance to bagging. On the other hand, stable patients with a tensioning pneumothorax are best served by a chest x-ray beforehand to confirm the diagnosis.
Needle thoracocentesis in this situation is unreliable, particularly in well built or obese patients since it may not reach the pleural space.
Thoracostomy (i.e. creating a hole in the chest) will reliably treat the likely tension pneumothorax. Complete the chest drain insertion and organise a prompt chest x-ray.
Summary
In summary, following trauma:
Chest drain insertion in the ED is indicated in a patient with a moderate or large pneumothorax, visible haemothorax or hemo/pneumothorax.
Deferred chest drain insertion (in the anaesthetic room) is appropriate if the patient has early surgery planned, is clinically stable and predicted to remain stable.
These are rare [4]:
- Consider checking platelet count and coagulation in those patients with known haematological disorders, or those on warfarin
- Routine haematological screening of patients is unnecessary
Kit Preparation

Unless chest drain insertion is urgent, explain the procedure to the patient and obtain written consent [1] and use a NATSSIP checklist. Then identify that you have the necessary kit. Note that in cases of life-threatening haemothorax, re-using the patients blood through use of a cell saver is only possible if the drainage system is primed with saline, not sterile water.
The items of kit include:
- Cotton wool
- Skin antiseptic solution e.g. iodine or chlorhexidine in alcohol
- Gauze swabs
- A selection of syringes and needles
- A scalpel blade
- Suture (e.g. ‘1’ silk)
- A chest drain
- 1% lignocaine
- 3 sterile drapes
- An instrument for blunt dissection (e.g. curved clamp).
Tube Size
Chest drain sizes range from 8 – 40F in adults; big number = big drain. Large-bore drains (>24F) are recommended for draining blood and require blunt dissection [5].
Smaller bore drains are appropriate for clearly isolated pneumothoraces i.e. no accompanying haemothorax – blood tends to clot within the drain, rendering it useless. Small-bore chest drains may be inserted by Seldinger technique (Fig 1).
Prime the underwater seal with saline (Fig 2) not sterile water, so that the drained blood is available for cell salvage in cases of massive blood loss.
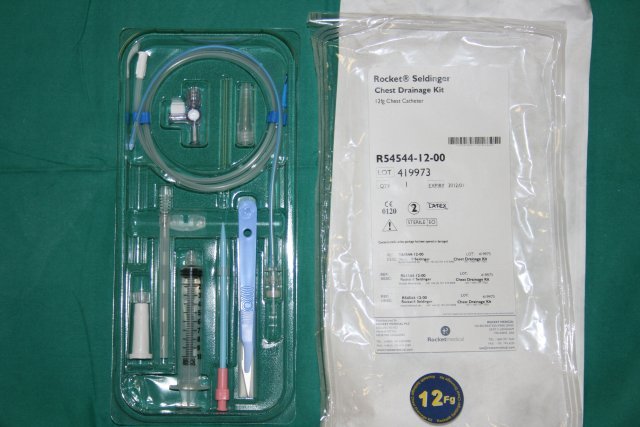
Fig 1: Seldinger kit (click on the image to enlarge)

Fig 2: Use saline not water
Do larger Seldinger chest drains exist?
Yes they do – but inserting them into haemothoraces is not considered as safe as the traditional (blunt dissection) method.
Learning bite
Prime the underwater seal with saline, not sterile water in cases of anticipated significant haemothorax so that the drained blood is available for cell salvage.
Positioning
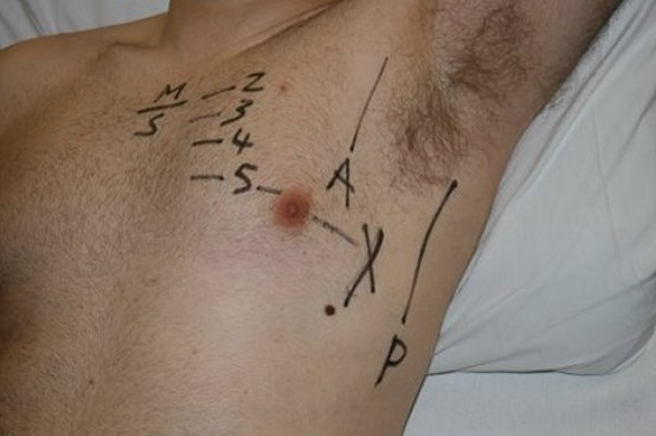
Before proceeding you will need to position your patient appropriately and mark the site of insertion.
The ideal position of your patient is lying flat or at 45 degrees, with their hand behind head, or abducted to 90 degrees if they are unconscious. Alternatively, a conscious patient may lean forward against a trolley table.
You can then begin to mark the point of insertion.
Key points in the procedure
- Find the second intercostal space
- Count down to fifth intercostal space
- Slide finger laterally in this space, to the mid-axillary line
- Mark the site
Sedation
You should not underestimate the anxiety and pain that chest drain insertion causes, even with the use of local anaesthesia. Strongly consider the use of intravenous benzodiazepines and/or opiates to pre-emptively relieve distress [4].
Avoid nitrous oxide/oxygen mixtures (e.g. Entonox ) since these will expand any pneumothorax, with potential dramatic clinical consequence.
Learning bite
Explain the procedure to the patient and obtain written consent where practical. Strongly consider the use of pre-emptive intravenous benzodiazepines and/or opiates.
- Does your patient really need a chest drain? Reconsider the indications – might observation be more appropriate? Review the clinical signs and chest x-ray
- Check your marked site of insertion is correct
- Whilst you will be concentrating on the skill of chest drain insertion, ensure that a team member is concentrating on the patient and patient’s monitor, particularly in unstable cases
- It is a strictly aseptic technique from here so ensure eye protection, sterile gown and gloves
Preparation
- Prepare the area with iodine/chlorhexidine
- Position sterile drapes, avoiding the patient’s face if he, or she, is conscious
Infiltrating Local Anaesthesia
The key points in the procedure are:
- Anaesthetise the skin
- Aspirate air or blood
- Anaesthetise pleura and chest wall
- Maximum 3 mg/kg 1% lignocaine
Pitfall
Stop if you cannot aspirate air, fluid or blood and reconsider your clinical diagnosis.
Incision and Blunt Dissection
When the anaesthesia has taken effect, make the incision.
The key points in the procedure are:
- Incise the skin
- Blunt dissection with curved clamp
- Pierce the pleura
- Widen the pleural breach
- 360 finger sweep
Inserting the Drain
Mount the tip of the chest drain on a clamp and guide it into the pleural cavity.
The key points in the procedure are:
- Mount the chest drain on a clamp
- Insert chest drain
- Ensure proximal drain hole lies within chest cavity
- Attach connecting tube to the underwater seal
Fogging of the Tube
Check for fogging.
Learning bite
Confirm that the drain lies within the chest wall cavity by noting fogging of the tube.
Securing the Drain
Finally, secure the drain.
Use ‘1’ silk to do this.
If the wound needs further sutures, close as you would do routinely.
The key points in the procedure are:
- Horizontal mattress suture
- Knot the suture 10 cm high
- Wrap the two ends firmly around the drain
- Pull the knot underneath the horizontal suture
- Loop around the drain and tie
Post-procedural Care
Patient
Confirm your patient is well; indeed their clinical parameters should improve.
Analgesia
Is there a need for top-up analgesia for your patient? There is some evidence that directing bupivacaine into the pleural cavity via the chest drain is beneficial [5].
Chest x-ray
Request a chest x-ray before the patient leaves the ED to indicate tube position and changing pathology. Note the chest x-ray may mislead you into thinking the drain is in the pleural cavity, when in fact it is in the chest wall. Fogging and swinging, confirm placement within the pleural cavity.

Further, check that the proximal hole of the tube (as demarcated by a break in the tube’s radiopaque linear line) lies medial to the lateral rib border on the chest x-ray (click on the x-ray to enlarge).
Chest drain position
What if the drain points upwards for the haemothorax, or conversely downwards for pneumothorax?
It actually does not matter. It is likely to be effective and should not be repositioned solely because of the x-ray position. [4,6]
Clamping and suctioning
Potential modifications to chest drain management include clamping the tube and suctioning.
Avoid both – the former in particular might lead to a tension pneumothorax. Leave these decisions to a senior thoracic surgeon when your patient is on a surgical ward.
Underwater seal
Note the underwater seal needs to remain below the insertion site at all times otherwise the contents start to empty into the chest. It is also vulnerable to being knocked over. Nursing staff, junior doctors and the patient need clear instructions to prevent them knocking over the underwater seal.
Sharps
Dispose of your sharps correctly – your responsibility.
Key Points
In addition to the fogging of the drain, confirm the drain lies within the chest by noting swinging with respiration. Do not clamp the chest tube or apply suction. The underwater seal needs to remain below the insertion site at all times.
The risks involved in chest drain insertion are significant.
Note the Rapid Response Report issued by the National Patient Safety Agency (NPSA) in 2008 which specifically asks:
- Patient selection – are you sure your patient needs a chest drain?
- Training – do you feel confident enough to do this? Are senior staff to hand?
- Equipment – are you familiar with the kit available?
- National Patient Safety Agency. National Reporting and Learning Service. Chest drains: risks associated with the insertion of chest drains. number 1065, May 2008, NPSA/2008/RRR003.
- Is a chest drain necessary in stable patients with traumatic pneumothorax? August 2008, BestBets.
- Chest drains in traumatic occult pneumothorax. December 2005, BestBets.
- Laws D, Neville E, Duffy J. BTS guidelines for the insertion of a chest drain. Thorax 2003;58(Suppl II):ii53-ii59.
- The use of intrapleural anaesthetic to reduce the pain of chest drain insertion. May 2007. BestBets.
- Antibiotics in patients with isolated chest trauma requiring chest drains. November 2002. BestBets.
- Do patients with a thoracostomy tube placed in the lung fissure need an additional thoracostomy tube placed? August 2008. BestBets.
- Advanced Trauma Life Support for Doctors, student course manual 7th edition. 2004. Chicago, Illinois, US
- Does it matter whether a chest drain is aimed upwards or downwards for the optimum drainage of fluid or air from the pleural cavity? June 2010. BestBets.

Aortic Dissection
This session covers the diagnosis and initial management of a patient with acute aortic dissection.

Thoracic Trauma
For each life-threatening thoracic injury this session includes: a definition and context, Clinical assessment , treatment and Key learning points.

Spontaneous Pneumothorax
This session covers the assessment and management of primary, secondary and tension pneumothoraces.
28 Comments
Very good revision
Thanks
Very nicely written, great for revision. Thank you.
Great for revision at any time, simple and easy to go through.
Very clear and usefull guide. Addition of pictures or videos for suturing of the tube and skin would be usefull.
good guide and learning points
Good review
Simple and informative
good revision
Useful revision. Thanks.
Useful
Excellent revision
NICE
Great recourse.
Brilliant guide
Thanks. Good revision
well organised and informative topic
its very helpful and fruitful
Great, informative and well presented module.
This is fantastic , thank you for the topic
good resource for review and reminding
v concise and v practical
nice
Good refresher re indications.
good revision points
Simple and informative
thank you all
Recently having a detailed discussion with a TTL regarding the same…Views are guidewires can puncture lungs or cause contusions and open technique should be used instead until The CoMiTED Trial UK comes out..
Any thoughts?
Thanks nice overview before training
Clear precise and to the point